East Arnhem Land in the Northern Territory is a paradise for landscape, portrait and wildlife photographers: crisp light, heavenly landscapes, deeply saturated colours, an age-old culture and warm, friendly people. What more could any photographer ask for? In this special feature Lynn Gail shares seven tips for photographers planning to visit this amazing location.
Note: Aboriginal and Torres Strait Islander readers are advised that this article contains images of Indigenous Australians.
I recently had the chance to visit East Arnhem Land, one of the most remote and stunning places in Australia. Situated on the northern eastern tip of the Northern Territory, this area covers more than 92,000 hectares of privately owned Aboriginal land. The culture of the Yolngu people is deeply rooted in this vast rugged landscape, where photographic possibilities are only limited by your imagination. Like to visit? Here are six tips to help you on your way.
01 GET A PERMIT
Entry to Aboriginal land requires a written permit. A permit offers written permission from the traditional owners to enter the private land of a family or group of Aboriginal people and is designed to help protect the privacy of Aboriginal communities, preserve Aboriginal culture, safeguard the natural environment and promote visitor safety.
The Northern Land Council administers the permit system on behalf of traditional owners. In most cases, there is no charge for a permit, however entry fees apply for some destinations. The Land Council requires a minimum of 10 working days to process a transit or visitor permit. Depending on your plans, extra time may be needed to contact all the relevant groups of traditional owners along your route. You can contact the Northern Land Council by phone on 08 89205100 or email permits@nlc.org.au)
If you want to spend time visiting and photographing the Yolngu people in their homelands Lirrwi Tourism – lirrwitourism.com.au – offers several immersive cultural tours.
East Arnhem Land.
02 TAKING PHOTOS
If you are fortunate enough to experience a ‘Welcome to Country’ ceremony be aware that photographs are not allowed during the ceremony and you are not permitted to talk.
There are other limitations too, so it's always a good idea to get permission before shooting.
Although the Yolngu speak and understand English very well any effort on your part to learn a few words is likely to be well received. Making connections with your subjects is important so take the time to talk and listen before you get your camera out. If you can establish a connection by chatting about your life and theirs, your photos are likely to be more engaging. 
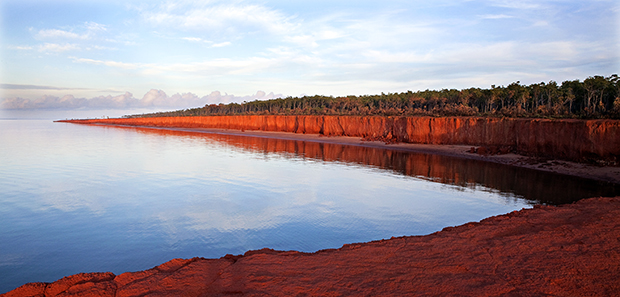
The Point, also known as The Needle, is a ten-minute walk from Nyinyikay Homeland. As the sun rises and lights up the rock face it is engulfed in a stunning rich red glow. Canon EOS 5D Mk II, 24-70mm lens, 1/60s @ f/18, ISO 640, handheld.
03 GETTING CANDID
The Yolngu people like a good laugh and that can make for some great candid images. Against a bright background containing sand or sky be aware of exposure issues as the camera tries to meter for the lighter background. Meter for your subject, with a view to darkening the background in post-production if it is over-exposed. Shooting in Raw will give you more options to pull and push the exposure later on. Also, consider recomposing by moving your subject to a more evenly shaded area. Another option is to place a reflector near your subject to bounce light onto the face and get a more even exposure. A small white, silver or gold reflector is ideal but you could also use a piece of white foamcore, cardboard or even white cloth to reduce shadows and even out the exposure. Always look for a catchlight, a small bright speck in the subject’s eye, to give the portrait some life.
By focusing on the eyes and cutting out the background there is nowhere for the eye to wander. The eyes allow the viewer to share a connection and get a sense of the person being photographed. Canon EOS 5D Mk II, 24-70mm lens, 1/60s @ f/5, ISO 320. Photoshop for cropping, sharpening, levels and 'burning in' bright edges.
04 IN THE BAG
A good all-round travel lens from 28-300mm will allow you to shoot a range of subjects from landscapes through to portraits. If you want to take individual lenses, pack a wide-angle zoom around 16-35mm for landscapes, a general 28-70mm zoom – a great walkabout lens – and a 70-200mm zoom, which is good for portrait and detail shots. A macro lens is handy for capturing the finer details.
A strong, steady travel tripod and a cable release are useful for landscapes, particularly if you want to shoot long-exposure images in low light. A head-torch will help you to keep both hands free if you're shooting before first light or after dark.
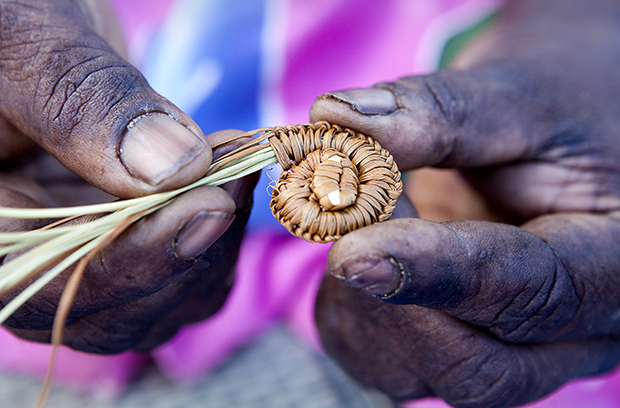
Beginnings of a basket being made from boiled and dyed pandanus leaves at Nyinyikay Homeland. Canon EOS 5D Mk II, 24-70mm lens, 1/200s @ f/5, ISO 250. Photoshop for levels, contrast, burning in edges, sharpness and cropping.
05 SAFETY
Always carry an emergency first-aid kit and plenty of water. Mobile phone coverage is patchy at best and non-existent in many places. One option is to hire a satellite phone and a personal locator beacon – a potential life saver if you do get into trouble.
When you’re in and around a bush area, keep an eye out for wild buffalo, dingoes and snakes. Crocodiles are an ever-present danger too – always observe crocodile warning signs and check with te locals before venturing anywhere near the water. 
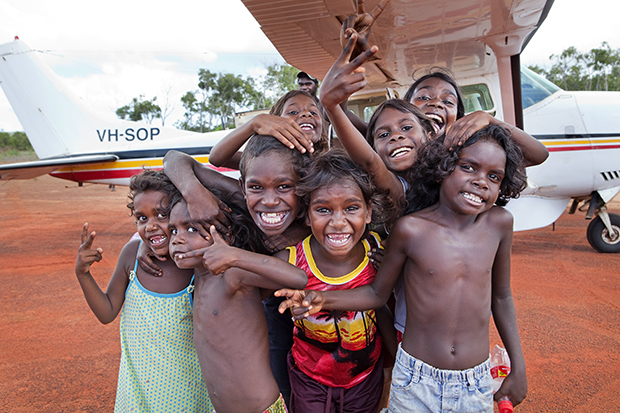
These Yolngu children were hamming it up for the camera before boarding a chartered flight back to their homeland from Nyinyikay’s airstrip. Including the light aircraft as a backdrop helps to tell the story. Canon EOS 5D Mk II, 24-70mm lens, 1/200s @ f/7.1, ISO 400. Photoshop for curves, levels, contrast, brightness and burning in of bright areas.
06 WHAT TO PACK
Take breathable, lightweight cotton clothes which are comfortable. Take hiking shoes, (open or closed) and a basic pair of thongs for moving around campsites. There are no shops and no internet access in the homelands. Take all the supplies you might need, such as a strong insect repellent, medications and all items of a personal nature. It can get cold at night, so pack a couple of warm pieces of clothing.
07 WHEN TO GO
The best time to visit the Top End is during the Dry Season, from June to October. Late October to November is very hot, with humidity rising just before the Wet Season, which lasts from December to March, when many areas are cut off and vehicle access is limited. During this period supplies are flown into the communities by a small charter plane. March to May is when everything starts to dry out.
Shooting from above creates a different view of an artist painting a story-pole at Yirkalla Art Centre, Nhulunbuy. Canon EOS 5D Mk II, 24-70mm lens, 1/60s @ f/4.5, ISO 1000. Photoshop for levels, sharpness, curves and contrast.
08 GOOD BOOKS
'Welcome to Country,' by LakLak Bburarrwanga covers the history, landscape and cultural aspects of life in East Arnhem Land. It’s published by Allen & Unwin. 'Weaving Lives Together at Bawaka – North East Arnhem Land,' talks about how lives are woven together though the making of story-telling baskets using pandanus leaves. It’s published by the Centre for Urban and Regional Studies.


