Want to shoot breathtaking seascapes? Check out these six clever tips from landscape photographer extraordinaire, Dylan Fox.
Growing up in Perth certainly had its perks. The city has some of the country’s most stunning beaches on its doorstep and if you venture north or south it only gets better. I haven’t seen all of Australia’s beaches but I would be willing to bet the Great Southern region of WA is home to some of them!
Being near such beautiful stretches of coastline has provided me with easy access to beautiful places to improve my photography and in particular, my coastal work.
When I first fell in love with landscape photography the vast majority of what I was photographing was local beaches. At the time I didn’t consider too many other factors other than being there for sunrise and sunset colours, and using long exposures to create the hazy water effect.
In the pursuit of making something special, I now consider many more elements when I am at the water’s edge with my camera. Here are some of them.
01 FINDING THE BEST LIGHT
One of the first things I think about once I have settled on a composition is lighting. How do I want to see the scene lit? Front-lit, side-lit or backlit? Would the scene work better in diffused light, full daylight or twilight? Depending on what I decide, this may mean the sun is in the frame and becomes part of the composition too, so that means considering its placement as an extra element and not just a light source.
Light direction and quality can dramatically alter the way a scene appears in the final image. Take for example the two images of Thistle Cove in Cape Le Grande National Park, WA, on this page as an example. While these images were shot from the same location, the change in lighting (the image on the left was taken at sunrise, the image on the right at sunset), makes for two very different images.
Keep in mind that a backlit scene (with the sun facing into the camera) works very well for adding drama to a scene as it generally increases the dynamic range. This is the kind of lighting I often use when photographing the coast because I love the results. Also, being on the West Coast, it occurs at sunset rather than sunrise!
A front-lit scene isn’t something I shoot as often as it often produces flat images with poor contrast and not much in the way of interesting shadows. However, if you have a decent sized peak in the scene, front lighting can be used to show the beauty of first light on the horizon as the rest of the land remains in shadow. The image ‘Temptations’ (below left) is an example of this.
Although a little less challenging, there are certain beaches where the pure white sand and stunning blue water is best showcased during the midday sun. The photograph of Lucky Bay (above), also in Cape Le Grande National Park, is an example where I couldn’t resist capturing the midday greens, blues and whites of this stunning stretch of coast. 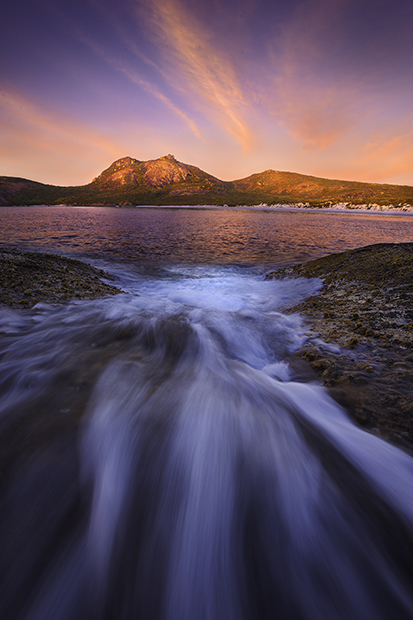

While these images were shot from the same location (Thistle Cove, Cape Le Grande, WA), the change in lighting makes for two very different images. The image on the left was taken at sunrise, the image on the right at sunset.
LEFT: 'Temptations, sunrise,' Thistle Cove, Cape Le Grande, WA. Sony A7R, 16-35mm f2.8 lens @ 16mm, 0.4s @ f/16, ISO 100, tripod.
RIGHT: 'Blaze above the Bay,' sunset, Thistle Cove, Cape Le Grande, WA. Sony A7R, 16-35mm f2.8 lens @ 16mm, 1/3s @ f/16, ISO 200, tripod.
02 THE TECHNICAL TRAP
As a beginner, it was easy to get caught up in all the cool technical things I was experimenting with such as stitching images to create wide panoramas and using long exposures to make rough water appear milky smooth. Although it was certainly useful to know those things, in retrospect I wonder if my interest in the technical aspects – things like stitching, exposure blending and focus stacking – overshadowed my ability to see and shoot a scene on its own merits.
It’s an important lesson; a technically perfect photograph is not necessarily a great photograph. Technique is important, but it should never come at the expense of training your eye to see stronger compositions.
One of the lessons I learned in this period was the value of narrowing in on a particular point of interest, rather than trying to take in the entirely of a scene. Although the whole coastline may be stunning to the eye from a high vantage point, it may not create a compelling image. Sometimes the best approach is to isolate a small interesting element. An example of this approach can be found in ‘Find a Way’ (right), which shows a stream of salt water rushing back out to sea through a crack in the Kalbarri rock shelf. Rather than trying to capture the beach in its entirety this image could have been taken at almost any beach. 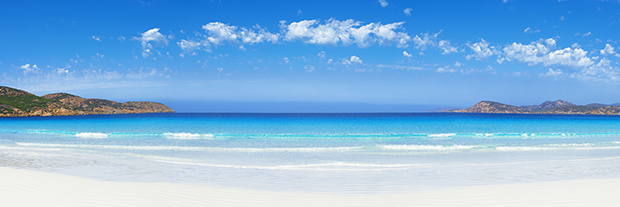
'Paradise Found,' Lucky Bay, WA, Sony A7R, 24-105mm lens @ 45mm, 1/250s @ f/16, ISO 100.
03 FAST OR SLOW?
While shooting with a long exposure can add to a picture, it’s not always the best option. I found that in always going for the long-exposure look I wasn’t always giving proper consideration to what was happening around me. Would the dramatic storm clouds in the scene be better complemented by an image that reveals the detail of the rough seas? Long exposures blur the water and create a feeling of peace and calm. Is that the look you always want? Absolutely not. Sometimes you’re better off dialing up a faster shutter speed to reveal the texture of a raging sea.
With more detail in the scene, the question then becomes, do I need to use a new element, apart from the water, to create a stronger composition. These are just a few things you should consider when choosing a shutter speed. Working with the textures that water creates is one of the most exciting parts of coastal photography for me.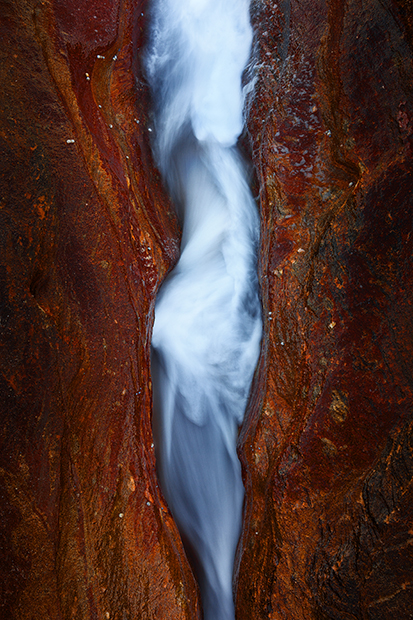
'Find A Way,’ Kalbarri, WA. Water retreating out to sea in a crack in the rocky coastline. Canon EOS 5D Mk II, 16-35mm lens @ 1/4s @ 26mm, f/13 @ ISO 100, tripod.
04 LEADING LINES
Leading lines are widely used by photographers to draw viewers into an image and control the way their attention is directed to key compositional elements. In coastal photography, water can be a really effective way to add leading lines where there otherwise might have been a bare patch of sand. Creating these leading lines is easily done when a wave has washed ashore and is retreating back to the sea (above right). Compared to shooting oncoming waves, receding water tends to produce straighter lines that are easier to predict. 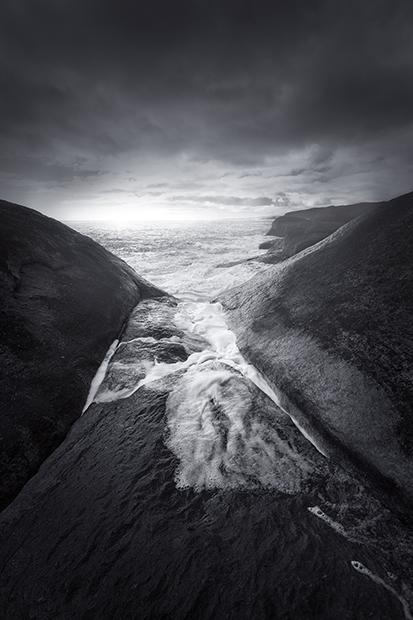
‘Look To The Edge.’ Rough afternoon seas were slamming against the coastal cliffs of the South West. This was shot handheld as I continued to retreat from incoming waves that would easily drag me of the edge and into the ocean. Canon EOS 5D MK II, 16-35mm f2.8 lens, 1/400s @ f/8, ISO 200 tripod.
05 KEEP IT SIMPLE
One of the challenges of shooting straight out to sea is the difficulty of finding interesting background elements. Look for an interesting cloud formation, or use the sun to create a starburst. In rare cases, you might be fortunate to see a distant lightning strike!
Shooting out to sea can be a great opportunity to practice shooting very simple compositions and to think about how you can use leading lines, colour, tone and foreground to create interest. Keep in mind that you won’t always get great light and colour. Don’t worry, just focus on the composition. The image on the next page shows a scene I photographed a number of different times a few years back. I didn’t initially settle on this frame and continued to return until I got an evening with a better display of colour. However, it didn’t seem to add to the photo and I realised that I much preferred this more subdued sunset where the focus was more on the water movement.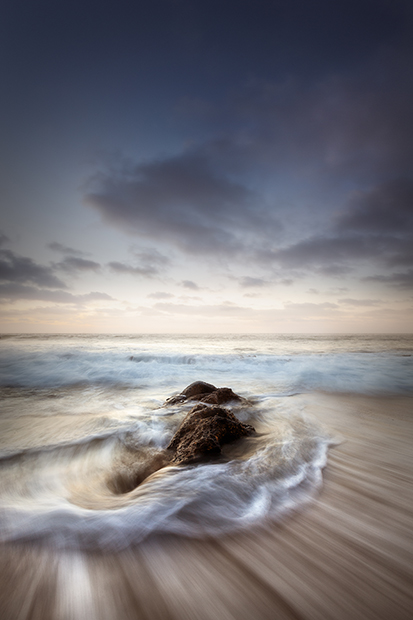
‘Just a Thought,’ North Beach, Western Australia. Canon EOS 5D MKII, 16-35mm f2.8 lens @ 16mm, 0.4s @ f/11, ISO 200, tripod.
06 STAY SAFE
There are obvious risks that come with being near the ocean, especially if you love dramatic wide-angle photographs like I do. Rock ledges can be dangerous places and it’s no place to be in rough seas. Even in calmer conditions, never turn your back on the ocean, have an exit strategy and remember that conditions can change quickly. Tides change too, so make sure the incoming tide isn’t going to leave you stranded.
It’s easy to get distracted taking photos, but you need to maintain an awareness of what’s happening around you. Life jackets, like the ones worn by rock fishermen, are a good safety precaution. Stay well away from the water if you are not a strong swimmer, or you are not experienced in the surf.
While your personal safety is the priority, obviously, it’s important to keep your gear safe too. Be prepared to lift your camera and tripod high into the air to avoid getting drenched. I have frantically dried camera gear more times than I care to remember and know many people who have completely written off camera bodies altogether. Stay safe!
Dylan Fox, is an award-winning Australian landscape photographer based in Perth, WA. See more of his work here: dylanfox.com.au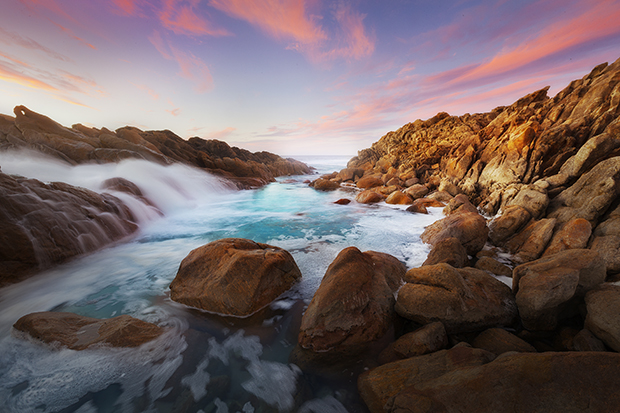
‘Wyadup’s Warmth.’ Sunset at Wyadup Beach, South West WA. With large swells the waves funnel through the rocky coastline and crash into this beautiful natural pool. Canon EOS 5D MK II, 16-35mm f2.8 lens @ 16mm, 1.6s @ f16, ISO 200, tripod.


