Most of the time getting a good photo isn’t as simple as just snapping one picture. Robert Keeley explains how you can work harder for a better image.
It might sound self-evident, but beginners in photography usually start out shooting few photos because they think one or two pictures is enough. Then, at some later point in their development, if they get drawn into the craft, they find they are taking too many. One of the keys to becoming better at the creative side of this craft comes from learning to recognize the ‘Goldilocks” moment – when the number of images you shoot of any given subject is just enough.
This is the point where you work on shooting your subject enough to get increasingly better results, but not enough to go stale. It can be a hard point to recognise, but it’s rarely done with just one image and frequently missed in the digital world by literally shooting the life out of a subject. Somewhere in between lies a point where you’ll hit a creative peak, and you can move on fruitfully to another subject. This applies as equally to long-term projects as it does to individual images, and it’s a really important element in making better creative decisions. It often comes with lots of practice, but seeing the process at work can help.
In this article I’m looking at one particular example of one subject, and offering a step-by-step breakdown of how I went about my decision making. You may or may not like these images, but the important thing here is to understand the process.
01 SPOTTING A SUBJECT

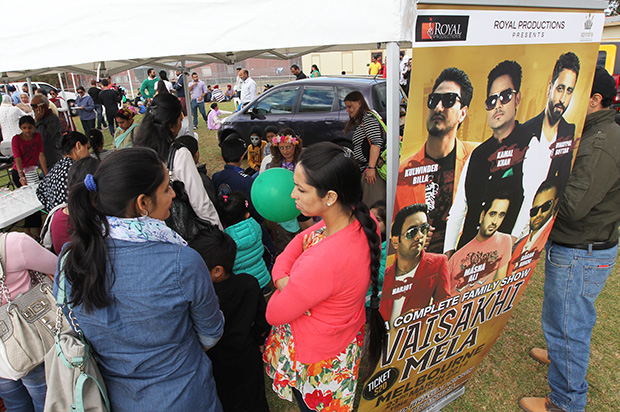
My first shot of this face painter was of little value, other than to get me thinking. My idea of shooting the painter surrounded by people diminished her while emphasizing the crowd. I needed to re-think my strategy and come up with something different.
I was wandering through a cultural festival searching for different subjects when I came across a woman involved in face-painting young children of various ages. This piqued my interest, and I thought I could make something of the idea as a picture. But there was a large crowd around the artist, and lots of parents and children involved. The first image I took (above) was simply an exercise in firing the camera, and the result was arguably irrelevant to my main aim. But sometimes simply taking one picture to start with helps in working up more creative ideas. In this instance, after examining the result, I knew I had to get a better angle on the action.
02 TRY ANOTHER ANGLE
I moved down low and shot this image (below) through the crowd. It was a much better idea, but I soon realised I was still too far away, and I couldn’t see the face of the youngster who was getting decorated. Also, the car behind the key subject was a distraction. I decided I needed to both get closer still, but also try another angle again. This image, while once again not particularly exciting, was a precursor to a more creative approach. It was better, but still not good enough. The key at this point is the ability to recognise this. There was more to get out of this subject, so I persevered.
 By moving into the waiting crowd and shooting from a lower angle I was able to focus the interest on the painter. But the face of the youngster was still not visible, and the car in the background was also a distraction.
03 GET CLOSER
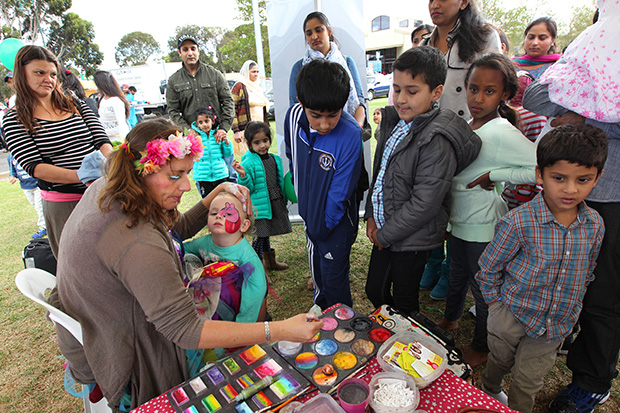
The great war photographer Robert Capa is said to have noted, “If your pictures aren’t good enough, you aren’t close enough!” Unfortunately he was killed by a landmine when he got too close to the action! But his statement still stands. Too many beginners don’t force themselves to get in close to their subject. It can be challenging and intimidating to get close to human subjects, but often you will find people don’t mind (and if they do you’ll find out soon enough!). This was a public event, so I decided to both move closer, and change my position in relation to the subject. Pictures about people invariably work better when you can see their faces. I positioned myself on their other side and moved in near the small table on which the artist had placed her paints so I had something of interest in the foreground. Now it was a matter of waiting for the best moment. I changed position and moved in very close to concentrate on the action of the artist. I was satisfied with my overall position much closer to the event, but I thought the faces of the waiting children would still be worth including.
04 CAPTURING THE MOMENT
The final element in making a better picture is anticipating the best moment to shoot. It’s here that many photographers can run off course, because in many ways this is the hardest instant to anticipate. Of course, with digital cameras it’s very easy to fire away endlessly and then spend an inordinate amount of time later on a computer finding the best shot. That will teach you how to edit images, but it will take lots of time, possibly annoy your subject to the point where you’re asked to leave, and will not sharpen your photographic instincts.
After I found what I thought was the best position I waited, and fired an occasional image. I could have asked the subjects to look towards the camera and smile. It would have been a legitimate approach. But I wanted a more natural scene. With so many people in the scene, I also wanted to capture a moment when all the faces were clear, and their expressions were contributing to the image. I took a few shots, but I wasn’t totally satisfied. Then, after a minute or two, I judged that I had the best image I was likely to get from the scenario.
There might well have been a better moment, or a better position, but that is the art and challenge of working up an image. Knowing when to shoot, and when to stop, is not a science, but a practiced skill. The more you do it, the better you’re going to get.
By zooming out a fraction I was able to include many of the surrounding faces. I also waited until the youngster being painted opened her eyes. This whole exercise. from beginning to end, took around two minutes. Hanging around longer could have caused a distraction when I was after a naturalistic scene.


