Photographers Steve & Ann Toon have carved out successful careers photographing animals in the wild. Here, they share their winning formula for capturing dramatic images of animals in action.
Whether it’s an intimate exchange or explosive motion, animal behaviour makes for great wildlife pictures. An active image generally trumps a passive one, even if the subject matter’s not fast-moving. For us, the thrill of observing animals behaving naturally in the wild is what wildlife photography is all about. Whether it’s a tender moment between a mother and her young, a magical bit of social interaction that strikes a human chord, a raptor riding the thermals or a herd of animals bursting away from a chasing predator; there’s no doubt capturing action photography is an addictive pastime. And while it can be technically tricky and difficult to pull off, it’s also hugely rewarding when you succeed.
1. Know before you go
To be successful you need to be as good a naturalist as you are a photographer. As ever, homework pays dividends. Behaviour encompasses a huge range of activities including dating and mating, habitat adaptation, threat display, play fighting, hunting, grooming, bonding, feeding, drinking and greeting. What is it you’re hoping to capture? If you’re planning to shoot birds in action, for example, do you want to photograph your subjects in the air, taking off, landing, swooping down on prey, splashing about in water or at the climax of an elaborate courtship display? Some animal action happens everywhere, every day, while some occurs for a short, well-defined period, perhaps just once a year and only in a certain location. Research will allow you to be in the best place at the right time so you can coincide with the action at its peak just as everything’s kicking off.
There’s lots of helpful information at your fingertips on the internet, and while you’re there don’t forget to ‘Google’ some of the behaviour images others have made of your target subjects. It’s not about stealing ideas, but taking inspiration from what’s already out there to help you find your own creative path. Check out video clips of your intended subject’s behaviour patterns too, increasingly available online, as this will clue you in on the key moments to start firing the shutter. Time spent simply watching wildlife will never be wasted. The ability to predict exactly what your subject will do next is more than half the battle. If we’re photographing majestic birds of prey in flight we know they usually lift their tail and defecate right before taking off from the perch. Little things like this can make all the difference between success and failure!
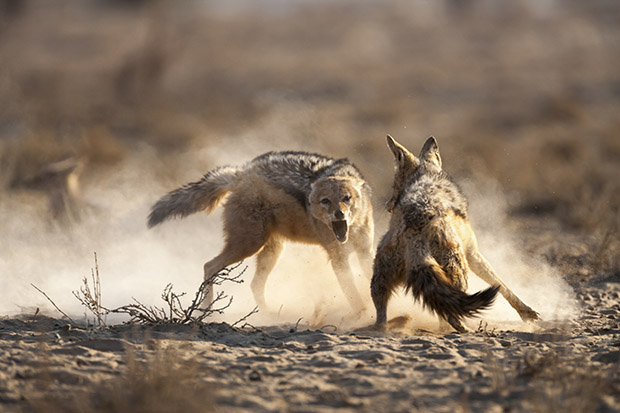
In dry dusty conditions you can ramp up the sense of explosive action by shooting into the light. Here, the swirling dust clouds add a sense of energy to this shot of jackals fighting. Canon EOS 1Ds Mk II, 500mm f4 lens plus 1.4x converter, 1/1000s @ f/6.3, ISO 250.
2. Get closer
First make yourself invisible (or irrelevant) to your subjects. They won’t hang around – let alone behave naturally – if they’re disturbed by your presence. Dress to blend into the background. This needn’t mean investing a month’s budget on specialist camouflage gear, but you might consider some scrim netting, or something equivalent, to break up your outline when you’re lying prone. Lying down will also make you appear less intimidating to smaller subjects, with the added bonus that you’ll shoot more natural-looking pictures.
Fingerless mitts, a hat and scarf will mask the lighter bits of your skin, and don’t forget to camouflage any reflections from your lens. Stay low, keep downwind, and creep forward gradually if you’re on foot, using any available rocks, trees, or bushes for cover. If you’re in open territory you’ll have to resort to belly crawling, but this is slow, painful and rarely successful.
One of the easiest ways to stay hidden is to work from a hide or a vehicle. Before going to the trouble and expense of setting up your own hide, check if there’s a good public facility you can use. We’re naturally lazy so we’re big advocates of the latter! Birds and animals are already used to fixed hides and provided you check the orientation of them first to work out what time of day the light’s right, these public hides are a great way to hone your skills when you’re starting out.
Your vehicle makes an excellent and comfortable hide too. There’s the advantage of mobility so you can manoeuvre into the right position and you can have a range of camera gear ready at all times. Keep a couple of bean bags handy to support longer lenses when you’re shooting from an open window.
Always cut your car engine before firing the camera’s shutter so you dampen any vibrations which cause camera shake. And never reverse back to a subject you spot when you’re driving along. It’s difficult to reverse smoothly. We always drive on past, get the camera ready, do a U-turn, and then re-approach slowly, killing the engine for the last bit and quietly cruising in.
The war photographer Robert Capa may well have famously encouraged us all to get closer, but with sensitive wild subjects we’d advise against pushing that too much. Animals which are preoccupied - fighting, feeding or breeding – might allow you a closer approach, but getting too close is unethical. If you’re lucky, some animals will move closer themselves if they don’t perceive you as a threat. Generally the safest way to make up that last bit of distance is to crop your image later.
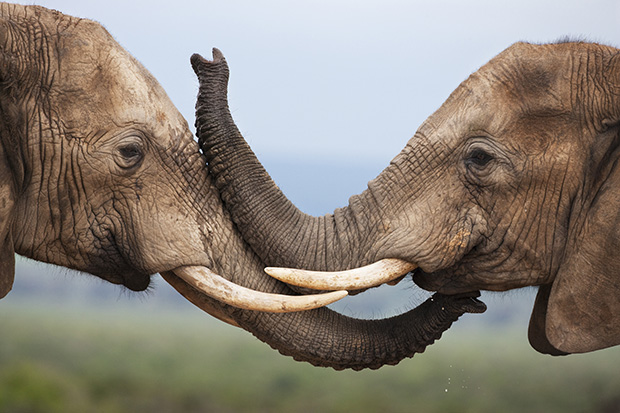
Look out for animal behaviour that mimics our own as this makes for stronger, more engaging images with tons of emotional appeal. Canon EOS 1Ds Mk II, 500mm f/4 lens, 1/640s @ f/6.3, ISO 400.
3. Timing is everything
The best times for shooting action and behaviour are dawn and dusk – when animals are at their most active. You’ll need fast shutter speeds at these times to freeze the movement of your subjects. But be prepared to increase your ISO rating substantially when shooting in periods of very low light. Better to get a sharp picture of some unique behaviour than no image at all - even if it does mean suffering some noise in your shot. These days Lightroom is pretty good at removing noise in post production, providing you don’t overdo it.
Be ready for the unexpected. Our default approach is to put our cameras on motor drive; set with the widest aperture possible so we’ve got the most speed available and can maximise our chances of grabbing a sharp image when something happens suddenly. We fine-tune camera settings – perhaps stopping down or making any exposure adjustments, once we’ve got something in the bag.
Spend as much time as possible with your subjects to fully cover any unfolding action. Patience is the key. Even if you think you’ve bagged the shot of the day, continue shooting because there’s always the chance there’ll be something better. The more time you spend in the field, the better your action and behavioural images will be.
Telephoto lenses help when photographing intimate behaviour. Not only do they allow you to work at a comfortable distance so your subjects feel relaxed enough to go about their business, but the narrow field of view will help focus attention on the main point of interest in your picture. We try to emphasise this further by keeping compositions clean and clutter-free. You don’t want too much depth of field, just enough to render subjects sharp throughout, while allowing the rest to fall off (we’re talking f/5.6 to f/11). Bear in mind you might need a touch more depth of field on occasion when the animals are moving in and out of a shallow plane of focus. Be alert at all times for anthropomorphic behaviour which will have a strong resonance with the viewer – animals touching noses that appear to be ‘kissing’ perhaps, or even a fleeting comic moment.
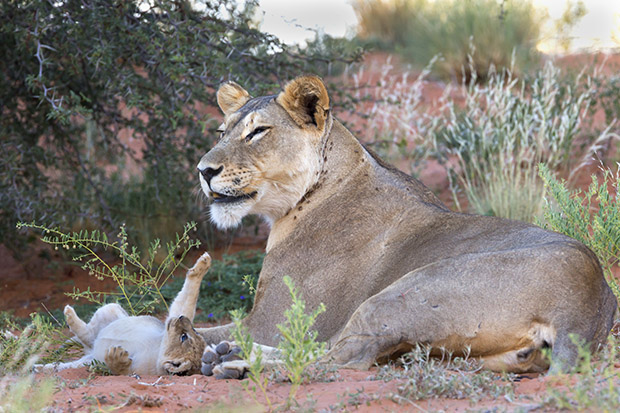
Animal behaviour is not just about breakneck speed, it’s also about capturing those magical quieter moments we don’t often get to witness, like a tiny lion cub playing with mum. Canon EOS 1Dx, 500mm f4 lens plus 1.4x converter, 1/200s @ f/10, ISO 800.
4. Gear up for flight
When things are happening fast it’s tricky to predict the exact nanosecond the shot’s going to be perfect. A camera with a fast frame rate and large memory buffer, which keeps you shooting for longer when the action takes place, will boost your chances of consistent success. If you’re serious about photographing full-on animal action there’s no way round the fact that a top-end DSLR and fast lenses offer precise and accurate tracking, which will give you a huge advantage. An entry-level model won’t be as effective at finding and holding focus and you’ll have to rely even more on your own sharp reflexes and good fortune for success.
Thankfully for your finances huge telephoto lenses aren’t always our first choice for action! Our 500mm lens is an ally when we need to work at a distance so as not to spook a shy subject, but it’s not always our “numero uno” for fast action stuff. For starters you need a sturdy tripod with a Wimberley head, which restricts your mobility. The limited field of view can also make it tough to find a fast-moving subject in the viewfinder. More often we’ll reach for our trusty 300mm f/4 lens, with or without a 1.4x extender.
It’s easy to handhold for long periods and it allows greater freedom of movement when we’re tracking subjects.
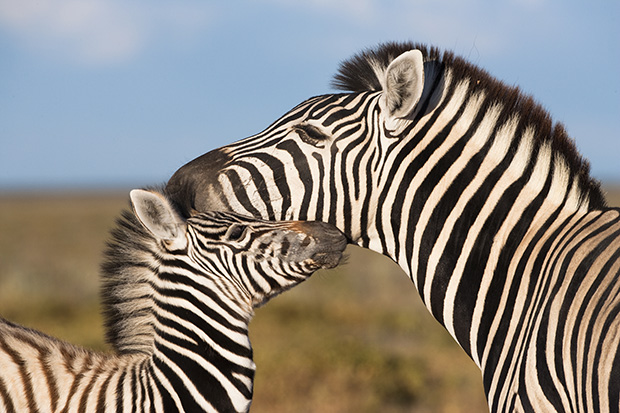
Spend as much time with your subjects as you can. With patience you find they often start to relax a bit and behave more naturally, providing you with more intimate and interesting images. Canon EOS 1Ds Mk II, 500mm, 1/500s @ f/10, ISO 200.
5. Freeze the moment
The shutter speed you’ll need to freeze animals in motion will largely depend on the conditions and your subject. You’ll need a very fast shutter speed (1/2000s or more) to freeze the wing-beats of fast-flying small birds, but you may have enough speed at 1/500s to get a sharp picture of a large raptor hanging in the wind. Learn to switch your camera to focus tracking (predictive continuous autofocus) without taking your eye from the viewfinder. And keep calm. Being all fingers and thumbs is the last thing you’ll need! Brace your elbows and be as well-balanced as possible if you’re hand holding. This will help you pan steadily and smoothly while tracking a moving subject. Keep your eye on the birdie, too. Don’t be tempted to break from your photography to review shots until all the action has finished or you might just miss the best opportunity.
We mostly stick to using centre spot focusing when photographing moving subjects, but if you do use multi-spots, or off-centre single spots, check your camera manual for which options are most responsive. Switch the stabilising technology to the pan setting. We often switch stabilising off completely when we’ve got high enough shutter speeds, so as not to slow down the autofocus mode. And don’t neglect to alter the focus-limiting switch, if your lens has one, to cut down on any hunting your lens has to do to find the subject.
The other point to bear in mind is to avoid being overly ambitious. Waiting until your subject fills the frame before pressing the shutter is a big gamble. Start shooting earlier rather than waiting for a perfect composition, and allow your subjects room to move within the frame. That way you won’t be disappointed because you’ve just clipped a wing, missed a tail or cut off part of an outstretched hind leg. You can always crop in tighter afterwards, but you can’t recreate what’s not there!

When photographing a group of moving subjects aim to hold focus on one of the animals nearest to you so a key part of your image will be in sharp focus. Canon EOS 5D Mk II, 500mm f/4 lens, 1/400s @ f/8, ISO 640.
6. Get arty
Sometimes low-light conditions make freeze-frame action photography a complete non-starter. But that needn’t mean you can’t get great shots of animals in motion. The trick is to turn those adverse shooting conditions to your advantage and get creative. Motion blur in action images can often be more successful at conveying the impression of a subject’s movement than a pin-sharp picture. Not everyone likes the more impressionistic results you get with slow shutter speeds, but there’s no denying their energy. To create successful motion-blur shots you’ll need to be able to photograph at speeds as low as 1/15s or 1/30s.
Pan smoothly with your moving subject while firing the shutter. This should ensure your background is completely blurred and indistinct while the outline shape of your subject should be clearly identifiable to viewers. Generally the images that work best have some suggestion of sharpness in the main subject – usually around the head. So have fun experimenting! It’s always fascinating seeing how these shots come out because they’re entirely unpredictable. There’s no right or wrong approach. If the result works for you it’s a success. 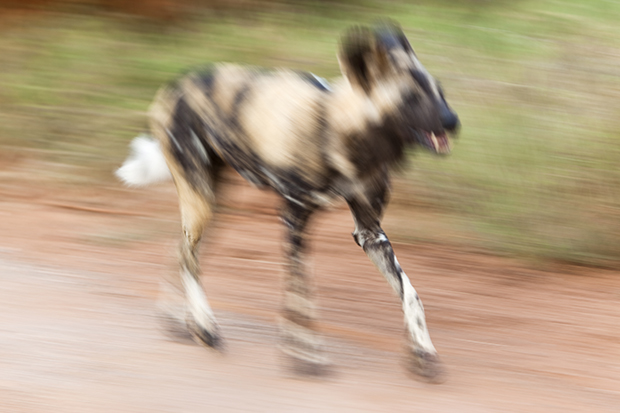
While most photographers are obsessed with sharpness, sometimes it pays to use a slower shutter speed to capture a sense of movement, as in this photo of an African wild dog. Canon EOS 5D Mk II, 70-200mm lens, 1/20s @ f/8, ISO 100.


