10 Expert Macro Tips: Shooting Spiders
Exploring macro can open up a world of detail in your photography. Australian Photography’s Mike O’Connor meets Sydney’s very own spiderman, Michael Duncan, to get the low-down on a tiny world just waiting to be discovered.
When I visit macro photographer extraordinaire Michael Duncan at Sydney University, he's hanging out in a room full of bees. They're everywhere, landing on the lights and buzzing around the room. He doesn't seem the least bit bothered.
It's easy to understand why. Michael's focus has been taken up with an entirely different subject in recent years—a species unique to Australia that's really got people buzzing—and his photographs are a big part of all the noise.
Alongside his ‘Project Maratus’ colleagues and fellow experts Michael Doe and Adam Fletcher, he has spent the last 12 months studying the remarkable habits of peacock spiders. Although records show they were discovered in the late 1800's, it wasn't until 2005 when one was witnessed jumping out onto a bush track that they began getting much attention.
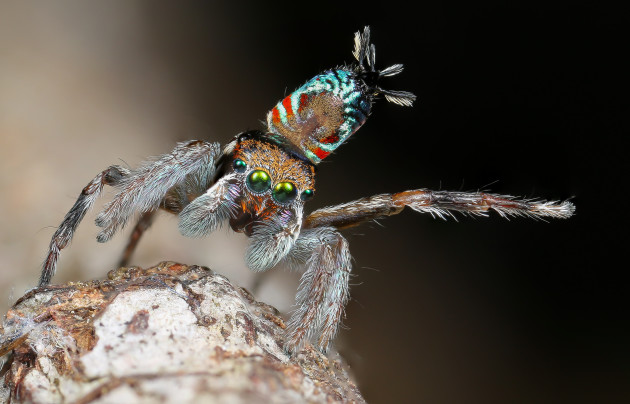
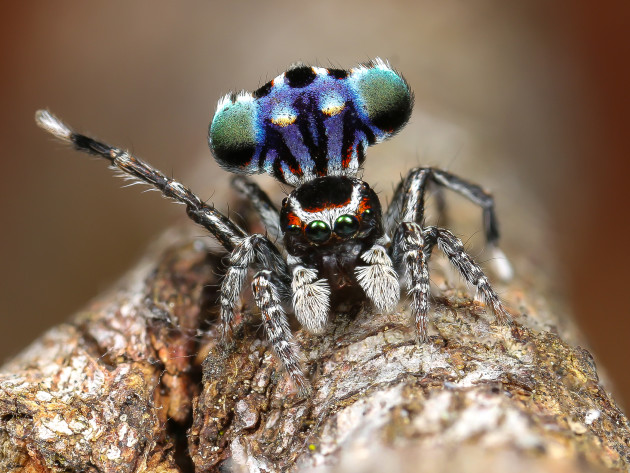
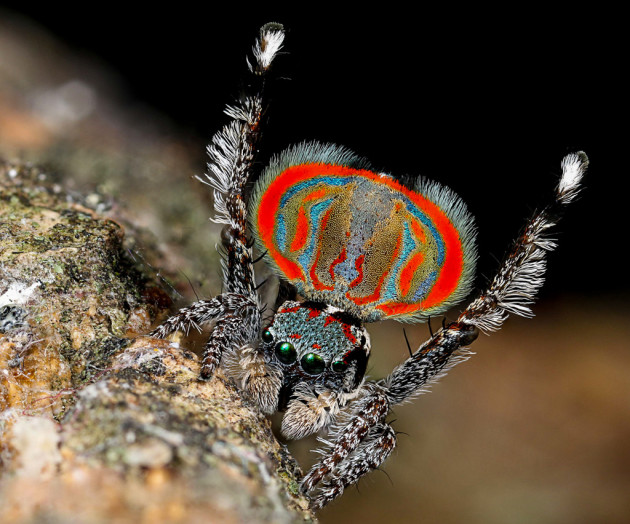
The spiders get their name from the beautiful colours displayed by males. To attract a female, the males raise their legs and wiggle their brightly coloured abdomen. If she's suitably impressed, the female will mate with him. It's amazing to watch and from the first time he saw them, Michael was hooked. He knew he had to photograph them.
“I'm an amateur photographer really, but I learnt a little about macro photography by taking photographs of reptiles and bees which I did as part of my research work. I knew I wanted to delve into it a bit further so I started with larger jumping spiders before moving to peacock spiders. What I love about macro is the unbelievable detail,” he explains.
Want to know what it takes to capture something so small in such incredible detail? Hard work, patience and a little bit of luck. Here's Michael's tips for macro success.
01 You don't need lots of gear
And you don't need to spend huge amounts of money either. Michael started shooting spiders with a basic setup comprised of a Tamron 90mm macro lens, Yongnuo flash and a Raynox diopter, a DCR250. The diopter is a simple snap on adaptor, much like a filter, that increases magnification on a lens – on a standard 50mm it will increase magnification by two and a half times. It's also a great low cost way to enter the world of macro photography.
Even if you don't want to invest in a dedicated setup, an alternative is to try reverse macro. By using a reversing ring, a small metal ring that has a standard filter thread on one side and a lens mount thread on the other, you can attach a regular prime or zoom lens to your camera backwards and make the most of it's magnification powers.
Michael believes the best lens for reverse macro like this is the humble 18-55mm kit lens packaged with most DSLRs, or a nifty 50 – a 50mm prime lens. Both are cheap lenses that can produce outstanding results perfect for web publication and social media. And better still, reverse macro rings can be purchased online for as little as $3 or $4.
His current set-up is slightly more refined. He uses a Canon EOS 70D, which he likes for the fold out touchscreen, as well as the benefits that come from a crop sensor. His lens of choice is a Canon MP-E 65mm f/2.8 1-5x Macro lens coupled with the MT-24EX twin macro flash. “It's a pretty unique lens, and has been an absolute game changer for me. It's fully manual, and comes with a pretty steep learning curve – but it allows for pretty incredible shots,” he says. The 5 to 1 macro essentially allows for incredibly close shots. “You could probably take a photo of just the eye of the spider if you wanted to,” he says.

02 Get to know your subject
With a species as quirky as peacock spiders, you'll need to spend time getting used to their behaviour if you want to photograph them with any success. I spend an hour carefully trying to get a male (brightly coloured) to display to a female (dull coloured). It involves carefully moving the male close to the female, but not too close as they may not display, likewise if you move them too far away, they probably won't see each other. The perfect arrangement to make the spiders display comes from trial and error. And if you want to photograph it when it happens, you have to make sure you're ready to take the shot at any moment.
Peacock spiders are relatively common and according to Michael, are found throughout Australia. “I get messages from all over the world saying 'can I come and find peacock spiders?', but it's not as easy as it sounds – they live in very specific areas.” Adding to the challenge is peacock spiders are not in colour all year round. “Males change colour after their final moult, and are only in colour for about three months of their lives in Spring,” he explains.
If you're just starting out with macro photography, Michael suggests finding detail in large subjects first. Flowers in particular are great for practicing. “Try spraying water on the leaves or flowers and capturing the droplets,” he says. “It's a great way to get a sense of the minuscule changes that can make a big difference to your final image.”
Another good subject is jumping spiders. They're bigger and easy to find too. “You can actually follow jumping spiders around, they're quite curious and make good subjects,” he explains. “I tell people to try feeding them a fly with a pair of tweezers – while eating they will stay still. If they are preoccupied they're a lot less worried about you being there.”
Michael reckons you can shoot jumping spiders with just about any gear – it's only when you want to start photographing smaller subjects you might need to consider higher magnification.

03 Be zen
Michael says it's vital that you are calm and relaxed when it comes to photographing moving subjects. If you're not having any luck, have a break, and go away and do something else.
“It's happened to me plenty of times, where I know I’m not in the right head space for it – the critical thing is to be patient,” he explains.
And like anything you have to have a passion for what you're doing if you're going to get the best results. “People ask me how I have the patience for photographing macro subjects. I can sit there and spend four hours taking photos of one spider to get one stack – but be hugely proud of the photo afterwards,” he says.

04 Play with depth of field
Getting your depth of field right for your subject can be a challenge in macro photography. Part of this is due to the fact that depth of field increments are measured in mere millimetres when up so close. If you do use a wide aperture, for example f/2.8-f/5, it will give you a shallow depth of field. Only a small range of your subject will be in focus, with the foreground and background blurred.
If you want to capture all the hairs on a spider in tight focus, you'll need to use a small aperture.
As he's progressed, Michael's moved to shooting smaller and smaller apertures, which requires slower shutter speeds to allow sufficient light into the sensor. “All my earlier single shot images were at f/22 to f/30 which were fine for social media, but when enlarged were soft,” he explains. “I then started exploring ways to get greater depth of field while still keeping the image as sharp as possible. Now I shoot at f/7 to f/11 for sharper images for focus stacking,” he adds.

05 Stack it
For Michael, focus stacking has brought his macro photography to another level.
Focus stacking is a brilliant way to get sharpness throughout your shot – and sharpness is everything in macro photography. The technique involves combining multiple images taken at different focus distances, with the resulting image having a greater depth of field than any of the individual source images.
Michael says it was his friends that helped him become better at focus stacking. “The three of us started challenging each other to take better and better stacked shots, and it evolved from there,” he explains.
“Our first stacks were pretty terrible, but that said, often three or four shots of a spider will still give you a decent picture for stacking – it's only when you want to get every hair in detail that you need to be taking more. We've worked out about 12-14 is a good number that will give you great coverage.”
He suggests starting in front of the subject, and moving forwards. “I like to start just before the legs. Before the spider comes in focus, you need to start shooting. It helps when shooting insects like spiders to follow it around the branch, and when it pauses, brace yourself, don't breathe, and continuously shoot.” Using a battery pack to assist firing your flash unit helps dramatically with recycling time...
Michael also advises when taking the images you intend to stack, to use continuous shutter. “I like using slow continuous shutter. I like to see where I’m moving across the spider, and sometimes it may mean I'll only need to take 350 photos instead of 700 in a shoot . It means a lot less time in front of the computer!”

06 Brace yourself
Keeping your images sharp when hand-holding your camera can be a challenge. Michael suggests bracing against a firm surface, squeeze your arms tight in against your body and holding the end of the lens firmly. “It'll give you the best chance of getting a sharp shot,” he says.
07 Light em' up
One of Michael's greatest challenges is light. To keep shutter speeds up he requires his flash to be coupled to a battery pack, and when shooting hundreds of frames, there is a real risk that the heat generated by the continuously firing flash will literally melt it. “You've gotta be wary during a shoot to let the flash rest after a few 100 shots. However it's easy to get carried away!” he laughs. You find you get all these unique poses – they're upside down, hanging at different angles, and you just want to go for it.”
Michael explains that regardless of what flash set-up you use, diffusion of your light is the key to high detail in your macro images. “I use packing foam bent over my twin macro flash heads in a concave shape. I have done this with every type of flash I own and the results speak for themselves. You can even do it with your built in “pop up” flash”. Diffusing the light, when the source is so close to your subject, removes harsh blow-outs that can occur in your images.

08 Bring the outside in
Moving your subject indoors can make macro photography easier. Because macro photography is typically more about the subject than the background, Michael prefers to shoot inside in a custom diorama. The one he shows me in his office is simple - a piece of twig and some leaves to imitate the outdoor environment, with the whole setting balanced on a lazy susan. “With the lazy susan it's easy to move the whole diorama if the spiders move,” he explains.
09 Embrace post processing
If you're going to focus stack, you'll need to get comfortable using post processing software to manage the large numbers of images to be combined. Luckily, the adobe products most photographers use are up to the task.
“Photoshop manages focus stacks brilliantly, and will even allow for minor corrections in movement,” explains Michael. “It makes the entire process much more efficient.”

10 Continue to challenge yourself
Michael finds it's the challenges from his friends that continue to push him to take sharper and sharper images. “I'm always looking for new things to try. Lately I’ve begun trying wide-angle macro using the new Venus Optics Laowa 15mm f/4 wide angle fully manual macro lens. “It's a new challenge entirely – stepping down aperture while trying to focus, while at the same time trying to get light into the lens – it's about challenging myself.”
For Michael, the challenge also comes from being part of a community that's at the forefront of research into these unique and beautiful species. “The buzz of discovering new spiders that nobody has ever seen before is pretty special,” he says. “It's impossible to explain what it was like the first time I found one myself.”
And new species are being found all the time. “It's exciting. Right now, there's huge parts of Australia that have never been searched for jumping spiders, and a lot of the spiders that have we have found were just on the side of the road – they are so small, nobody's ever looked for them.”
With 30 plus described since 2005, there's clearly plenty of them out there. “In the next few years there will probably be another 30 described – were right at the start with these guys,” he says. ❂
If you would like to follow more of “Project Maratus” work you can visit www.facebook.com/projectmaratus


