Creative photography tips to get your mind moving (Part two)
This is part two of a two part series on creative photography techniques. You can see part one, from last week, here.
Shoot the same object in creative ways
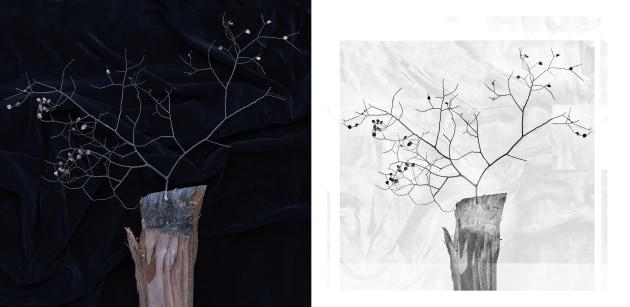
For the last five years, I have had the same branch I’ve travelled with pinned up on my wall as I still really like the look of it. In the 2020 lockdown, I was inspired to make some more images of it.

I took it into the garage to photograph it with some chunks of wood that I’d also taken a liking to from our wood pile. I made lots of new still life experiments over lockdown. Many of them didn’t make the cut but those that did make me happy.
For the first image here, I lay a background of black velvet onto the floor, and crumpled it up a little so that it looked like a landscape. Then, I added the block of wood with the beech tree branch blu-tacked to the top. While shooting, I regularly checked my exposure to make sure that the black velvet didn’t over expose. You may find you need to adjust your Auto exposure setting to -1.5 Exposure Compensation as the correct exposure is for the light tones of the branch.
After an initial crop to square and a clean-up of spots and dust I found on the black velvet, I simply inverted the tones to a negative in Photoshop. This made a high key artwork, that I have now printed and covered in Encaustic Wax.
Make an in-camera multiple exposure
One of my favourite techniques to play with are in-camera multiple exposures. Almost all modern digital cameras offer this function, and I love the variations that can be made using the different blending modes of lighten, darken, additive, and average while shooting up to nine overlapping images. My favourite option is the average mode where two images average out together (black and white will make a grey). You can also select any RAW image on your card and use that for a new multiple exposure idea.

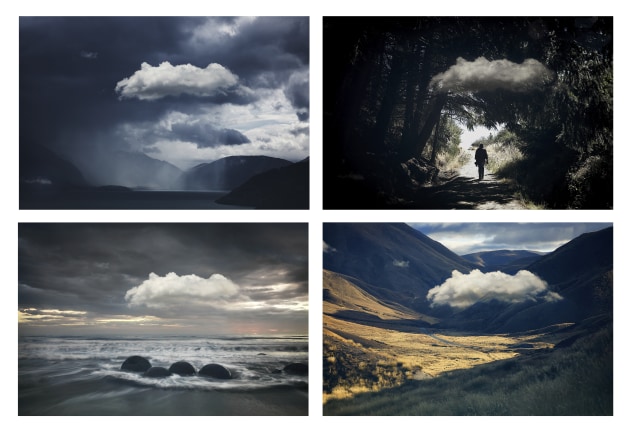
In practice, it’s relatively simple. Think of an idea, get your exposure right, and turn on the multiple exposure mode, then select ‘Average’. From there, scroll through the files on the card to find the right image, select it, and then turn on Live View mode to line the cloud up with the current image in front of you.
That is what I have done with my series called #Rankencloud. With my Canon 5D MK IV, I have repeatedly selected a file of a cloud on my camera’s SD card. Whenever I wanted to use the cloud, I would insert that particular SD card into my camera and make the shot. Then, so as not to fill up the card with other images, I swap it back again with the original card. For more in-depth information about in-camera multiple exposures, check your camera’s manual. ❂
About the author: Jackie Ranken is an Australian born, multi-award winning landscape/art photographer who has lived in New Zealand since 2004. She has over thirty five years’ experience within the visual arts and has been an international awards judge since 2002.
She combines her art practice with teaching and is a presenter in workshops and seminars internationally. Her passion is the creation of multi-layered narratives via in camera multiple exposures and intentional movements. Allowing play and serendipity into her creative process gives her personal freedom to break rules and push the so-called boundaries of traditional image making processes.
Since 2001 she has won many prestigious photography awards which have culminated in making her a Grand Master of both the Australian and the New Zealand Institutes of Professional Photography. She is a Canon Master and EIZO Ambassador. See more at qccp.co.nz.


