Life after dark: photo tips for night time street photos (part one)
Night-time photography has always been a major part of my work as a travel photographer, and a genre in which I’ve captured plenty of my own personal favourite images over the years too.
In southeast Asia where I live, there’s a buzz on the streets around sunset, as people go about their regular evening street-food hunt. But as much as this is a great time to shoot, it’s not really what I would consider night photography, but more of a prelude to things to come.
There’s often a lull for a couple of hours while people go home and do whatever they do before coming out again later in the evening – just in time for true night-time shooting.

In between these times you have the magical ‘blue hour’, a time not to be missed by any photographer. This is a great time for capturing bigger and wider images where you can shoot buildings and street scenes as the lights start to switch on.
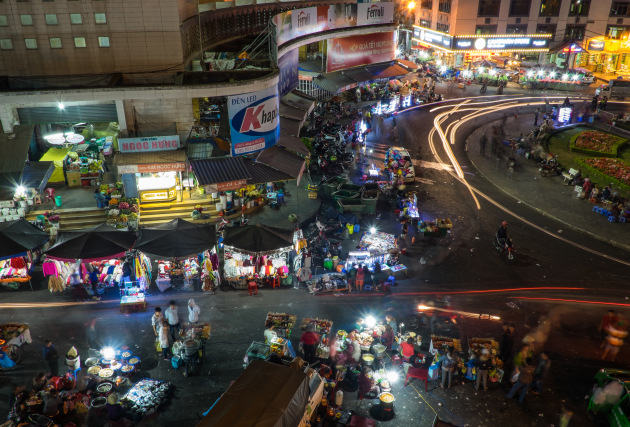
Blue hour is also a great time for long exposures as you often get light trails from commuter traffic.
In western countries the lights often come on earlier than in the East. There’s often less hustle around blue hour, and then things tend to liven up in city centre districts later in the evening.
This mid-evening time is great for shooting people on the streets. In many western countries things do tend to wind down earlier too – which is just as well when shooting, as late night is not the safest time to be out there.
Planning
My own approach to night photography is to aim for a combination of both slow (long exposure) and fast (people and street) imagery. This way I capture a diverse variety of imagery.

If I have the time, I generally separate these styles and try to shoot one way one evening and follow up with the opposite approach the next, which allows me to fully focus and not rush.
Always try and find out when a place, buildings and scenes do light up and come to life. This is best done with a walk about, but a bit of online sleuthing may also help if you’re pressed for time.
Split decisions
Once you’ve made your decision about how to shoot, it’s time to think about the logistics. If time allows, I’ll try to spend one evening on foot and one using public transport to target a certain district and shoot long exposures.
This often means hopping busses, trains, tuk tuks or taxis, so always build in plenty of extra time if you do get stuck in a taxi during rush hour your window for shooting might be short.
Also, travel light. Try and get to most of the major buildings and sights within 3-4 hours, with a little extra time built-in for those impromptu scenes that jump out unexpectedly.

Finally, if you’re happy with your evening and things are still alive on the streets, then consider swapping your gear around and shooting in a street style if you can.
Long exposures
When it comes to long exposures with a tripod, I find a shot list can be useful for new locations. Aim for skyline type images, something with water in it (rivers, fountains, or pools), plus an image with blurred (moving) people, or light trails.

This may not sound like a lot of images for an evening’s work, but when you factor in the time for set-up, and the number of mishaps that inevitably occur, then you’ll find 3-4 decent night-time long exposures in one evening is a tough ask. Take your time and try not to rush.
For skylines and iconic buildings, start shooting around blue hour or soon after the buildings’ light up. This probably means you will only have time to capture one blue hour scene, so always go for your prime target first and work the scene!
As the light drops, look to capture light trail or motion images where the darkening sky is a lesser part of the scene.
In bigger cities, try to get high up. Many of the bigger hotels have rooftop bars or restaurants with panoramic views. Be prepared to pay for an expensive cocktail to get up into them, but it is often worth it. Again, Google is your friend here for researching the kinds of shots that might be possible. Failing this, look for waterfronts, where you can shoot across and capture reflections in the water.

Finally, for tighter images, look for streams of moving vehicle traffic for light trails or crowds of people walking around in multiple directions, preferably with some illumination on them. Street markets are great for this.
Look out for part two next week.


